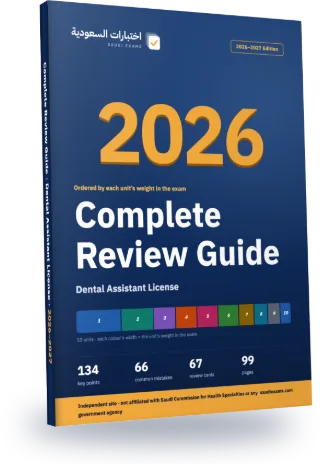
Dental Assistant License Complete Review Guide 2026–2027
Every exam topic in a 99-page Arabic PDF, ordered from the heaviest unit to the lightest. The first three chapters alone cover about 45% of the exam questions.
- 99Pages
- 134Key points
- 66Common mistakes
- 67Flashcards
Guide map
Each chapter is one exam unit, ordered by its weight in the real exam.
| Chapter | Unit | Weight | Exam questions | Key points |
|---|---|---|---|---|
| 1 | Dental Assistant | 20% | 30 | 14 |
| 2 | Dental Materials | 15% | 22 | 14 |
| 3 | Oral Anatomy | 10% | 15 | 14 |
| 4 | Dental Radiography | 10% | 15 | 14 |
| 5 | Infection Control | 10% | 15 | 14 |
| 6 | Preventive Dentistry | 10% | 15 | 14 |
| 7 | Dental Emergency and MCP | 7% | 11 | 14 |
| 8 | Dental Terminology | 7% | 10 | 9 |
| 9 | Communication and Patient Education | 6% | 9 | 13 |
| 10 | Ethics | 5% | 8 | 14 |
Chapter 1 in full: Dental Assistant
20% of the exam, about 30 questions. These are its key points, as in the guide.
- Prepare in a clean-to-ready sequence. Review the planned procedure and current health information; arrange the appropriate tray, materials, suction and protective equipment. Complete surface cleaning/disinfection and replace barriers before seating the next patient. Inspect instrument packs and required indicators before opening. A torn barrier requires attention to the exposed surface, not another layer over contamination. Reusable removable intraoral air/water tips and handpieces require their validated cleaning and heat-sterilization process; discard single-use tips. Hand hygiene and a fresh pair of gloves accompany patient changes, and damaged gloves need prompt replacement.
- Seat and position deliberately. Begin routine entry with the chair upright, explain movement and recline gradually; support the head and neck without forcing an extreme position. Adjust both stools for visibility and supported feet, and keep the operator's foot control within comfortable reach. The assistant commonly sits higher. For conventional maxillary access, chin-up positioning and a light above the chest directed toward the upper arch are useful starting arrangements, then adjust to the actual tooth and patient. Assess wheelchair mobility and the transfer plan before moving the patient; use trained help and appropriate aids. Feeling faint calls for stopping treatment, alerting the dentist and supported supine positioning with leg elevation when appropriate, alongside assessment.
- Coordinate four-handed work around the patient's head as a clock. For a right-handed dentist, the conventional zones are operator 7–12, assistant 2–4, transfer 4–7 and static equipment 12–2 o'clock. The assistant normally transfers with the left hand while the right manages suction. Hold the next instrument at its nonworking handle end, with its working end oriented to the correct arch. In the usual one-handed exchange, the ring/little-finger side receives the used instrument while the thumb/index-finger side delivers the new one into the dentist's working grasp. Exchange securely outside the mouth over the chest; keep the eyes on the field and anticipate from the procedure, not by changing the procedure to fit a prepared instrument.
The rest of chapter 1, on this page
- Choose moisture control by function. Retraction moves cheek, lip or tongue away; a mirror also provides indirect vision and reflected light. Cotton rolls and pads absorb fluid and need replacement when saturated. A saliva ejector collects pooled saliva with its opening unobstructed; do not ask the patient to seal the lips tightly around it because backflow can occur. Position HVE beside the treatment source to capture water, debris and spray while preserving the view and coolant delivery. Avoid sustained tissue suction or forceful pressure. A dental dam separates the operating tooth from the oral environment; inspect the clamp and secure a retrieval floss ligature before trial placement.
- For a light-cured composite, prepare the prescribed restorative material, adhesive system, placement instruments, matrix/wedge when needed, curing unit and finishing supplies. Maintain effective isolation through bonding and successive increments. Protect unused light-sensitive material from operating light and recap its container; never return dispensed leftovers to the supply. Check the light tip for debris or damage, use appropriate blue-light eye protection, and position it correctly. Wavelength compatibility, tip distance, alignment, exposure and material thickness all affect curing. After one increment, anticipate another increment or finishing as directed rather than removing isolation automatically. Finishing burs, discs, strips and polishing points serve different surfaces.
- For amalgam assisting, recognize the working sequence: prepare isolation and any required matrix, triturate the selected material as specified, load the carrier, then anticipate the condenser. Condensation adapts successive portions; carving creates anatomy after placement. A Class II matrix supplies a temporary missing proximal wall and contains the material. The wedge adapts the cervical area, while appropriate separation compensates for band thickness. A sectional composite system may add a separation ring. Matrix placement is not a substitute for moisture isolation, and a matrix does not create the finished occlusal grooves by itself.
- A crown-preparation visit and a crown-delivery visit require different setups. Before preparation, confirm tooth, plan and laboratory requirements and take the shade while teeth remain hydrated under suitable lighting. Retraction cord temporarily opens the sulcus to expose the finish line; a selected hemostatic agent may help control bleeding. An impression or scan records preparation detail, whereas a bite record relates opposing arches in the prescribed jaw position. The laboratory prescription needs case identification, tooth, material, shade and due date. Example: record the shade before drying, assist preparation and margin recording, then protect the tooth with the planned provisional; do not schedule final cementation before the laboratory restoration is ready.
- Prepare luting cement only after confirming the product and the dentist's readiness. Accurate proportioning and complete mixing provide a usable film; a partially set, watery or crumbly mix can compromise seating. Follow the selected product's working time and permitted adjustments rather than improvising the ratio. Before provisional cementation, the clinician checks margins, proximal contacts and occlusion. Articulating paper marks occlusal contacts; it does not replace a jaw-relation record. Eugenol-containing temporary materials can interfere with some resin systems, so confirm compatibility and the prescribed non-eugenol alternative when needed. A provisional should be assessed before cement hides an incomplete seat.
- For a conventional alginate impression, prepare a suitable tray, measured powder and water, bowl and spatula. Explain the sensation, nasal breathing and a hand signal for distress before insertion. Follow the product's mixing and setting instructions; keep the tray stable while the gel develops. Carefully manage accessible loose excess without shifting the tray. Severe gagging or airway concern changes the priority: alert the dentist, stop the impression and assist prompt removal and safe positioning. Alginate is an irreversible hydrocolloid: water loss or uptake can distort it. Disinfect compatibly and pour promptly, or use the exact storage allowance of an extended-pour product; immersion in water is not a universal storage method.
- For nonsurgical endodontics, preserve dental-dam isolation and aseptic handling of files, paper points and irrigating supplies; organize them in the operator's sequence. Root-end surgery is a different procedure: an apicoectomy accesses the root tip through surgical tissue access and needs an appropriate surgical set. Oral surgery, including implant uncovery, requires sterile irrigant delivered through a sterile pathway that bypasses conventional unit waterlines. Use a suitable sterile surgical aspirator with controlled retraction and visibility. Prepare needle holder, selected suture, tissue forceps and scissors for suturing; suture removal needs cutting and grasping instruments. During periodontal bleeding or abscess drainage, coordinate suction and prescribed irrigation/hemostatic supplies without sealing suction onto injured tissue.
- Keep sharps and reusable sets under control throughout the procedure. Agree on a neutral zone and communication for sharp exchanges; do not hand-pass an unsheathed anesthetic needle. If recapping is required, use a safety device or one-handed scoop, then dispose of used sharps near the point of use in a puncture-resistant container. Do not bend a used needle. Remove a dropped or contaminated instrument and obtain a sterile replacement. A cassette organizes the set and reduces handling, but still requires cleaning, inspection, packaging and sterilization. Protect mirror surfaces from scratching during compatible cleaning and storage. A stable finger rest supports instrument control; retraction equipment does not replace that fulcrum.
- With children, make the next step predictable: explain in age-appropriate words, demonstrate without threat, then do what was described. Calm conversation or counting can redirect attention; avoid competing adult voices. Plan manageable visits and reassess comfort. A correctly sized mouth prop may support opening in a cooperative child, but does not replace monitoring or authorize forced restraint. During orthodontic banding, maintain local absorption and suction. When wires are cut or changed, control the loose ends immediately to protect the airway. Wax can temporarily cover an irritating wire while the clinician is informed. For varnish, prepare the selected product, applicator and gauze and give its own aftercare; moisture-tolerant varnish is not managed like a resin sealant.
- Special equipment adds specific checks. During nitrous oxide use, observe breathing, responsiveness and comfort along with reservoir-bag movement, mask fit and scavenging; report abnormalities promptly. A flowmeter reading alone is not patient monitoring. After moderate sedation, support continuing recovery observation and confirm the clinician's discharge assessment, escort arrangements and verbal/written instructions; a fixed waiting time or the patient's claim of alertness is insufficient. For laser procedures, prepare wavelength- and optical-density-appropriate eye protection and plume evacuation near its source. Ordinary tinted glasses and distant low-volume suction do not meet those functions. Perform delegated monitoring and equipment tasks only with the required training and authorization.
- Make the record a usable account of care. Verify patient, tooth and surfaces, distinguish existing conditions, proposed treatment and completed work, and use the chart's legend. Document the procedure actually performed, relevant materials, reactions or complications, advice and follow-up. For local anesthesia, record agent/concentration, amount actually administered, vasoconstrictor strength, site/technique and reactions; opened cartridges alone are not a dose record. Arithmetic example: 2% means 20 mg/mL, so an actually administered 1.7 mL contains 34 mg; this calculates an amount, not a safe maximum or permission to inject. Record cancellation timing and the patient's stated reason without inventing one. Sequence future visits around clinical priorities, updated health, laboratory readiness and the agreed treatment plan.
Common mistakes in this chapter
- A clean-looking instrument, an ultrasonic-cleaned cassette or an alcohol-wiped dropped instrument is not thereby sterile. Remove contaminated items from use and obtain properly processed replacements.
- HVE captures spray; a saliva ejector removes pooled fluid. Neither replaces a dental dam for nonsurgical endodontic treatment, and suction must not deprive a cutting bur of coolant.
- Flushing can expel retracted material; it does not remove established waterline biofilm or make surgical water sterile. A sterile bottle feeding a conventional contaminated pathway does not guarantee a sterile outlet.
- Do not transfer one material's instructions to another: composite thickness and curing exposure, alginate storage, cement proportions and varnish aftercare depend on the selected product.
- Shade selection belongs before dehydration. A dry tooth may look lighter; a whitening baseline records the starting shade and does not promise the final result.
- Red and blue charting conventions are useful exam cues, but the chart legend and procedure status control interpretation. Planned treatment is not evidence that treatment was completed.
- Finishing treatment is not the same as recovering from sedation. An assistant observes, reports and supports the prescribed plan; discharge follows the qualified clinician's documented assessment.
The other chapters are in the full guide
One purchase · lifetime access · review guide included
7-day review plan
The chapters are spread over 6 days by weight so each day carries a similar load. Day 7 is a full exam.
Day 1 · 20% of the exam
Chapter 1: Dental Assistant
Day 2 · 15% of the exam
Chapter 2: Dental Materials
Day 3 · 17% of the exam
Chapter 3: Oral Anatomy
Chapter 7: Dental Emergency and MCPDay 4 · 17% of the exam
Chapter 4: Dental Radiography
Chapter 8: Dental TerminologyDay 5 · 16% of the exam
Chapter 5: Infection Control
Chapter 9: Communication and Patient EducationDay 6 · 15% of the exam
Chapter 6: Preventive Dentistry
Chapter 10: EthicsDay 7
Full mock exam: 150 questions in 180 minutes, then review the common mistakes in the units where you lost marks.
How many correct answers do you need?
- Pass mark 55%83 correct out of 150
Before you read: see your score today
10 free questions from the main units, no sign-up. Then you know which chapter to start with.
Try 10 free questions and see your levelA look at each chapter
The first three key points of each chapter, as they appear in the guide (in Arabic in the PDF).
Chapter 1: Dental Assistant
- Prepare in a clean-to-ready sequence. Review the planned procedure and current health information; arrange…
- Seat and position deliberately. Begin routine entry with the chair upright, explain movement and…
- Coordinate four-handed work around the patient's head as a clock. For a right-handed dentist…
Chapter 2: Dental Materials
- Start with function and timing. An impression is a negative reproduction; the poured cast…
- Alginate is an irreversible hydrocolloid
- Elastomers provide elastic recovery and fine-detail recording. Addition silicone, also called PVS or VPS…
Chapter 3: Oral Anatomy
- A complete primary dentition has 20 teeth
- Always name the numbering system and use the patient’s right and left. Universal permanent…
- Describe a surface by direction
Chapter 4: Dental Radiography
- Image formation depends on differential attenuation. Metal and mineralized tissue generally appear radiopaque (lighter);…
- With other conditions fixed, mAs = mA × exposure time controls photon quantity. In…
- Filtration removes low-energy photons that mainly add patient dose; collimation restricts beam size and…
Chapter 5: Infection Control
- Standard precautions apply to every patient. They combine hand hygiene, PPE, respiratory hygiene, sharps…
- Clean hands before and after patient care and before gloves and after their removal…
- For anticipated blood or saliva spray, protect clothing and exposed skin and wear a…
Chapter 6: Preventive Dentistry
- 1. Caries is a changing mineral balance. Biofilm bacteria ferment dietary carbohydrates and produce…
- 2. Assess risk and lesion activity together. Ask about recent caries, fluoride use, sugar…
- 3. Plaque, calculus and periodontal destruction are not interchangeable. Plaque is an adherent microbial…
Chapter 7: Dental Emergency and MCP
- 1. Build a usable medical assessment. At each visit, ask about changes in diagnoses…
- 2. Make the first minute a team response. Stop treatment and make the working…
- 3. Distinguish presyncope from unexplained collapse. Needle anticipation with pallor, nausea, sweating and a…
Chapter 8: Dental Terminology
- Directional terms use fixed landmarks. Mesial is toward the dental arch midline; distal is…
- Name surfaces by what they face
- Cervical identifies the neck region where crown and root meet; apical means toward the…
Chapter 9: Communication and Patient Education
- Begin with an open invitation such as “What is worrying you most about today’s…
- Empathy means recognizing and acknowledging the patient’s experience without judging it or replacing it…
- Before a procedure, explain its purpose, the broad steps, sensations the patient may notice…
Chapter 10: Ethics
- Scope is a three-part check
- An invasive task requires specific authorization, not a general impression that the assistant is…
- Consent is a process
The full guide comes with lifetime access
The full guide (99 pages) is included with lifetime access to this exam, together with every question and full mock exam. Chapter 1 is free for everyone.
Questions about the guide
Is the guide free?
Chapter 1 is free to read on the guide page. The full guide comes with lifetime access to this exam; 7-day access does not include it.
Is it up to date for 2026–2027?
Yes. Unit weights and exam facts follow what the exam body last published, and the last check date is printed in the guide. If the standards change we update the file and buyers download the new version.
Does the guide have questions?
No. The guide covers key points and common mistakes; scoring, weak-area practice and full mock exams are on the site.
Can I read it on my phone?
Yes. A5 pages in a single column, with chapters linked from the contents.
- Pages
- 99
- Edition
- 1448 AH · 2026–2027
- Language
- Arabic
- Last updated
Buy this exam
Pick the access that lasts until your test date.
Included
- Full mock exams: 150 questions in 180 minutes, with a score for every unit
- 500 questions, every option explained with its source
- Practice that starts with your weakest units, plus a review of your mistakes
- Complete Review Guide 2026–2027 (PDF), with lifetime access only
Continue with your Google account and you go straight to the payment page.
You pay on the Waffo Pancake checkout page (in English). The amount is in US dollars and your bank converts it to riyals. One payment with no automatic renewal, by Visa, Mastercard (a mada card with either logo works too), Apple Pay or Google Pay. Your statement shows "WAFFO". Purchases are not refundable.